Showing posts with label Kids. Show all posts

Friday, April 22, 2011

Quick Cookie Cake Decorating


My daughter stayed up late one night to make this cookie cake for one of her teachers - and yes, she is the "Teacher's Pet."  It has been long enough ago, that I cannot remember the occasion for the cookie cake, but I do remember that I ended up having to decorate it for her in the morning before she went to school.   Now, mornings around here are quite busy getting 4 kids off to school, so I had to come up with something easy and quick.  Thank goodness for canned frosting (both chocolate and white) and some yellow food coloring.  I also have one of these handy dandy decorating tools that made piping very quick - much easier than filling plastic decorating bags!

Now, I know it's no work of art, but it's cute nonetheless - don't you think?

For some reason I feel like shopping at Walmart now. . .

Sunday, January 23, 2011

Zebra Cake


So, my daughter's Sweet 16th birthday was coming up and she decided on an animal print theme.  So we went with a "Wild Thing Sweet 16 Party."  I wanted her to have a cool cake, but the local grocery store bakeries didn't have what I wanted, and I didn't want to spend a fortune to have it made by a real cake decorator. So, I did a little research and came up with a plan to have both the inside and the outside of the cake have zebra stripes! I know - cool, right?! Here is the process for my inside and out zebra cake.
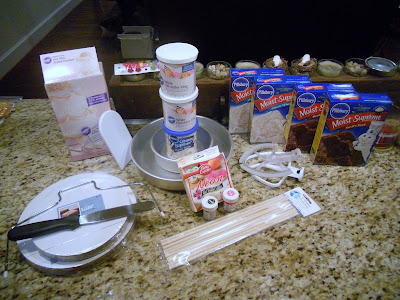
First I needed the cake layers. I found many references on the web on how to make a cake that when you cut into it looks like zebra stripes. Click here to see the process of pouring alternate colors of cake batter into the pan to make zebra stripes. For my cakes I just used boxed cake mixes - white and devils food.

Assembly of ingredients
I found that one box of white and one box of devils food made enough batter to make one 10 inch round layer and one 6 inch round layer plus about 9 cupcakes with the leftover batter.  I did the whole process twice to create all my layers.

Batter poured into pan
Cupcakes made from extra batter
After I baked and cooled the cake layers, I removed them from the pans and put them on cardboard cake rounds.  I needed the cakes to be absolutely level so that the final product would look, well not crooked. The cake decorating supply department had this really cool cake topper gadget for evenly removing the rounded cake tops.

Man I totally love that thing! Here is my level cake layer:


Then I put chocolate frosting between the 10 inch layers to make my cake base, and the 6 inch layers to make my cake top.


Notice the big chunk of cake that tore out of the bottom of one of my 10 inch layers when I removed it from the pan.  I didn't freak out about it, I just filled it in with my buttercream frosting when I did my crumb coat.


See, you can't even tell.  Now a person could make the buttercream to do this smooth crumb coat, but I decided to save myself some time and purchased two containers of cake decorating frosting.  I allowed the crumb coat to harden uncovered in the refrigerator overnight.


Then rolled out the fondant and covered the cake.  I watched this YouTube video to figure out how to do it.


I trimmed off the excess with my pizza cutter.


And used this handy little fondant smoother to "polish" and smooth.

I added some lime green food color gel to some more fondant and did the same thing to my top layer.


Here are my top and base all ready to earn their zebra stripes and giraffe dots.


Before I stacked the layers or decorated the lower layer with stripes, I marked the top of the lower tier by tracing around the 6 inch pan base with a knife tip.  This left me with an indentation in the fondant showing where the top tier would be placed later. I also measured and cut 4 cake dowels and pushed them into the cake within the marked circle below to keep the cake from collapsing once the top got put on - sorry, I forgot to take a picture of this.


I watched this awesome YouTube video on how to make a fondant zebra stripe cake.  I just used white fondant and mixed in black food color gel since my cake decorating department isn't large enough to carry pre made black fondant.


I then covered the top layer in black giraffe spots.  The real deal would've been yellow with brown spots, but the lime green and black matched her party colors better.  Then I made a bow out of hot pink colored fondant. Here are the final elements of the cake.


Then I stacked the tiers.


Put the pink ribbon on. The bow still had to dry for 24 hours, so it's not on the cake yet.


Sent out invitations.


And has us a grrrrrrreat party!


Oh, and here's a picture of two of the slices (trust me it's hard to cut into the cake when you put so much time into it).


Yay - the zebra stripes go all the way through the cake!!


Tuesday, January 4, 2011

Peanut Butter Reindeer Cookies

With a fond and wistful farewell to the Christmas holidays I wanted to blog one of our favorite holiday recipes.  These cute reindeer have been a part of our Christmas tradition for many years now.  Even the smallest children can create these cute guys without needing much help.

Peanut Butter Reindeer Cookies
1/2 cup margarine
3/4 cup creamy peanut butter
1/2 cup sugar
1/2 cup brown sugar
1 egg
1 1/4 cups flour
1/2 tsp baking powder
3/4 tsp baking soda
1/4 tsp salt
mini pretzel twists
m&ms® plain chocolate candies, brown eyes, red nose

1. Heat oven to 375 degrees. Beat margarine, peanut butter, sugars, and egg. Mix all dry ingredients and add to margarine mixture.


Roll dough into 24 large balls approx, 1 1/4 inch diameter and 24 small balls approx, 1 inch diameter. Positoin one samll ball under one large ball on a cookie sheet, then lightly press down and together to form shape of reindeer. Press two pretzels into the top ball for antlers; add candy pieces for nose and eyes. Bake for 10- 12 minutes..


Now it's time to enjoy or share with friends.  I look forward to seeing these little guys again next year :)

Sunday, August 29, 2010

Grilled Pizzas


One of our favorite dinners is "make  your own pizza" night.  When we first started doing it I would set out a huge variety of toppings for the kids to choose from, and all they would use is the pepperoni, olives, and Canadian Bacon. So to prevent unnecessary labor and waste, our topping bar usually only consists of a few well loved toppings, but when we have guests over we get fancy and break out more!


First you need some good dough.  This is the recipe I use.

Pizza Dough

1 1/2 cups warm water
2 t. yeast
2 t. sugar
2 t. salt
2 T. olive oil
4 1/4 cups flour

Dissolve yeast in warm water.  Add sugar, salt, and olive oil.  Mix in enough of the flour to make a soft dough.  Knead dough on a floured surface.  Cover and let rise 1-4 hours until ready to use.  Divide dough into 6 balls and let rest 10 minutes.  Roll out and place on greased pans dusted lightly with cornmeal.

I purchased a dozen 10 inch pizza pans from an online restaurant supplier a few years back, and we use them all the time.  Click here if you need some too :)

Then you need some sauce.  You can buy some or it's really simple to make.  For the grilled pizzas I like to make a fresh summertime sauce made with fresh basil from my backyard.

Summertime Basil Pizza Sauce

1 can Hunt's Fire Roasted Tomatoes (or petite diced)
1/4 cup fresh basil leaves
1 Tbs Parmesan cheese grated
3 cloves garlic, pressed
1 teaspoon italian seasoning
1/2 teaspoon onion powder
1/2 teaspoon salt
1/2 teaspoon sugar

1. Wash and rough chop basil leaves.  Place all ingredients in a food processor and blend until smooth.

2. Let sit 2 or more hours before using.

Then set out your favorite toppings like canadian bacon, pepperoni, olives, mushrooms, green peppers, bacon crumbles, tomatoes, pineapple, etc.

Sauce your crust, sprinkle with grated mozzarella, top with your toppings.  Here's mine:


The dough is too soft to place directly on the grill, so I oven bake these a 425 for 8 minutes first.  They come out not quite done like this:


Then take them outside and slide them off the pans onto a preheated medium low grill.


Close the cover and let 'em cook.  The whole point in grilling them is so that the crust on your pizzas will be phenomenal, and your backyard will smell like a brick oven pizzaria.  I check the bottom crust often and pull them off the grill when it looks dark brown and crispy but not burned. Let them cool 5 minutes, slice and serve.  Trust me, these are really good!

Friday, July 9, 2010

Chocolate Dipped Strawberries


This week I was asked to make 50 chocolate dipped strawberries for the final evening of the Girls' Camp which my daughters have been attending.  When asked to do it, I was surprised to realize that I had never actually dipped strawberries before, but I knew I could figure it out.

Chocolate Dipped Strawberries

Strawberries - large, firm & ripe
Chocolate Almond Bark
Wax paper

First I washed and dried my berries leaving the green stems intact.


Then I melted my Almond Bark in the microwave, stirring after every 30 seconds so as not to overheat the chocolate.


I used a 2 cup glass Pyrex to melt my chocolate in, because I wanted the chocolate to be deep enough for the tallest strawberries.


My son Harrison was a great helper.  We started with the tallest berries first because the chocolate was deepest and worked our way down to the smallest berries.  After dipping each berry we held it above the chocolate and swirled it in a circle a few times to get the excess chocolate off and allow the chocolate to flow into the nooks and crannies of the berry.  We laid our berries on a sheet of wax paper to allow the chocolate to set.  A few minutes in the refrigerater and they were all ready to go.

It was a fun and easy project, and they tasted oh, so delicious.  Next time I will drizzle some white chocolate over the top to make them even prettier.
Related Posts Plugin for WordPress, Blogger...